Tooling Holes and Panel Design for Automated Assembly
A tooling hole is the reference the whole line uses, and the panel it sits in is the carrier that gets the boards through every machine. If the holes are undersized, poorly positioned or placed in a rail that flexes, every fixture downstream inherits the error, and the symptom appears at the far end of the process as a placement or test failure.
What Tooling Holes Are For
Tooling holes locate the panel mechanically on printers, placement machines, test fixtures and depaneling equipment. They are the physical counterpart of the fiducials, which locate the pattern optically, and the two should agree with each other so that a panel located by pins also presents its fiducials in the expected position.
They also carry the panel through handling. A panel with well-placed holes can be picked up, stacked and moved without touching the boards, which reduces contamination and mechanical damage at the same time as it improves registration.
Standard Sizes and Tolerances
Tooling holes are usually non-plated and between 2 and 4 mm in diameter, matched to the pins on the equipment the panel will run on. The diameter tolerance is typically a few hundredths of a millimetre, because a loose fit allows the panel to shift while a tight fit makes loading difficult and wears the pins.
The position tolerance is the one that matters more. Holes are normally located to within about 0.05 to 0.075 mm of their nominal position relative to each other, since the registration of the whole panel depends on the relationship between the holes rather than on their absolute coordinates.
Position and Hole Count
Three holes locate a panel unambiguously in two dimensions and rotation, while two holes are sufficient if the panel edge provides a stop. Most designs use three or four, placed so that they span the panel rather than clustering at one end, because holes close together cannot resolve a rotation error or detect panel distortion.
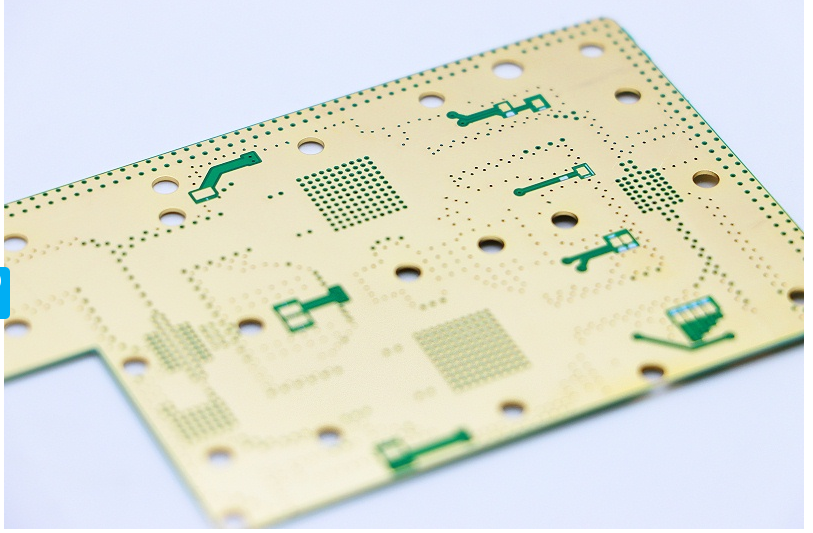
The holes should be placed in the rail rather than in the board area wherever possible, both to preserve board area and to keep the tooling away from components. Where a hole has to be in a board, it needs clearance from the circuitry and it should be non-plated so that it does not create a conductive path.
<img src="https://www.gopcba.com/wp-content/uploads/2026/09/202-1.jpg" alt="Panel rail with tooling holes and breakaway tabs on a PCB array” />
Panel Rails and Breakaway Design
The rail is what gives the holes something rigid to sit in, and its width and stiffness determine how much the panel bends when it is pinned. A rail of 5 to 10 mm is typical, and the material and thickness should match the board so that the rail does not distort the panel during reflow.
Breakaway tabs are sized so that the boards can be separated without damage to the edges. Tab widths of a few millimetres with a routed web, sometimes with small perforations, are standard; the tab must be strong enough to survive the assembly process and weak enough to break cleanly at depaneling.
Fiducial Placement Relative to Tooling
Fiducials and tooling holes serve different systems, and they should be placed so that they are consistent with each other. Fiducials are usually within a defined distance of the tooling holes, and they are positioned so that the optical system can see them with the panel pinned, which means avoiding places where a clamp or a pin blocks the view.
Where a panel has multiple board images, each board should carry its own fiducial set if the placement accuracy requires it, because panel-level fiducials only correct the panel, not the local variation of each image. The choice is a function of the accuracy needed and the panel size.
Panel Warpage and Hole Alignment
A warped panel does not sit flat on a fixture, and the holes can bind against the pins or pull the panel into position by force. Binding is a symptom rather than a cause: it means the panel does not lie flat, which is usually a lamination or a copper balance issue in the array design.
A panel that has to be forced onto the pins will move during processing, so the registration achieved at loading is not the registration at printing. Where this is happening, the panel design and the copper distribution are worth reviewing before the fixture is blamed.
Tooling Holes Through Assembly and Test
The same holes are used at printing, placement, reflow, test and depaneling, and each step applies slightly different loads. A hole that fits comfortably on a printer may be a tight fit on a test fixture with rigid pins, and the difference is felt as difficulty in loading rather than as a defect.
Where a panel is used on several machines, the pin diameters should be checked against the hole specification rather than assumed to match. A fixture with worn or oversized pins produces a panel that moves, which shows up as an intermittent test failure or a placement offset that appears only on that machine.
Common Panel Design Mistakes
The frequent mistakes are rails that are too narrow to stay rigid, holes placed in a corner where they cannot define rotation, tabs positioned where the depaneling stress reaches a component, and copper distributed so unevenly that the panel warps. Each of them produces a problem that appears to belong to a machine rather than to the panel.
Another common one is treating the panel as a drawing detail rather than as a design element. On a dense assembly the panel geometry can make the difference between a process that runs and one that fights the equipment, and it deserves the same review as the board layout.
Specifying the Panel on the Drawing
The fabrication drawing should state the hole diameter and tolerance, the position tolerance relative to each other, the rail width and the tab geometry, and the panel dimensions. Where the assembly line requires a specific pin arrangement, that requirement belongs in the same document rather than in a separate instruction.
It should also state the fiducial type and position and the relationship between the fiducials and the tooling holes. A panel drawing that defines the holes and leaves the fiducials to the board file is a common source of registration arguments at the printer.
Points to Confirm at First Article
Documentation exists so that a person who was not present can reproduce the work and reach the same conclusion. The acceptance criteria should be written before the work starts, so that the decision is made by the specification rather than by the person inspecting.
Related reading: our fabrication notes, board quality and design release notes cover the same ground.
FAQ
What size should tooling holes be? Usually 2 to 4 mm non-plated, matched to the machine pins, with a position tolerance of about 0.05 to 0.075 mm relative to each other.
Why are three holes usually specified? Three holes define position and rotation without relying on a panel edge, while two holes rely on an edge stop and can miss a rotation error.
What happens if the panel does not sit flat? The holes can bind on the pins and the panel is pulled into position by force, so the registration at printing is not what was intended. Review the array design and copper balance.