LED Backlight Driver Layout Design
An LED backlight looks like a simple string of diodes and a resistor, but a display that has to dim smoothly, hold its brightness across temperature and stay quiet in an EMC test needs a proper driver. The circuit is a switching converter, and the layout rules that apply to any switching supply apply here, with two additions: current matching between strings and a dimming path that must not produce audible or visible artefacts.
How a Backlight String Is Driven
An LED has a forward voltage that changes only slightly with current, so driving a string from a fixed voltage gives a current that varies widely with temperature and between parts. The practical approach is to drive the string with a controlled current, either by regulating the voltage across a sense resistor in series with the string or by regulating the current directly.
The forward voltage of the string is usually higher than the input supply, which is why a boost converter is the standard topology for battery powered displays. The converter raises the rail to whatever the string needs and the current regulator sets the brightness. On a mains powered display the same function can be provided by a buck or a flyback stage, but the control problem is unchanged.
A string of many LEDs also has a voltage that varies with temperature, and it falls as the panel warms. A converter that regulates current handles that automatically, while one that regulates voltage produces a current that rises with temperature, which can lead to thermal runaway in a poorly cooled design.
Boost Converter Basics for LED Strings
The boost converter stores energy in an inductor while the switch is on and delivers it to the output through a diode when the switch turns off. The output voltage is set by the duty cycle, and the inductor current is continuous in the normal operating mode, which keeps the ripple at the output low and the current in the LEDs smooth.
The inductor is the component that most often limits the design. Its saturation current must exceed the peak current with margin, and its direct current resistance sets the conduction loss. A saturating inductor will allow the current to rise abruptly, which trips the current limit and causes the output to drop, a symptom that appears only at high brightness and is easy to misdiagnose as a driver fault.
The output capacitor has to absorb a ripple current comparable to the average output current, so it must be a low impedance type with a ripple current rating that matches. A small ceramic capacitor alone may be insufficient at higher power, and a parallel electrolytic or polymer capacitor is often needed to keep the ripple voltage within the limit that the current regulator can reject.

Current Matching Between Strings
A large panel uses several strings in parallel, and each one needs the same current for even brightness. Matching depends on the tolerance of the forward voltages and on the regulator topology. A single current regulator for all strings in parallel shares the current according to the string voltages, which can produce visible differences of ten percent or more.
Separate regulators per string solve the problem at the cost of additional components and headroom. A common compromise is one boost stage feeding several current sinks, each with its own sense resistor and control loop. The sink with the highest forward voltage drop sets the required rail, and the others dissipate the difference as heat, which must be included in the thermal design.
current matching also depends on the layout. If the sense resistors are at different temperatures, their values differ, and the current in each string follows. Place the sense resistors together so they share a thermal environment, and use parts with a low temperature coefficient so the residual mismatch stays small.
Dimming Methods and Their Trade-offs
Analog dimming varies the current through the string, which changes the colour slightly because the emission spectrum shifts with current, but produces no audible noise and requires no special filtering. It is the simpler method and the one to choose unless the application needs a very wide dimming range.
PWM dimming switches the current on and off at a rate above the visible flicker threshold, and the eye averages the result. The dimming ratio can be very wide and the colour stays constant, at the cost of a switching current that couples into the rest of the system. The dimming frequency has to stay above a few hundred hertz to avoid visible flicker during motion, and above the audible range if the panel or the inductor can buzz.
Mixing the two methods gives a wide range with good behaviour at low brightness: analog dimming for the top part of the range and PWM below the point where colour shift becomes visible. Whichever is used, the dimming signal should be kept away from the current sense traces, because a fast edge coupled into the sense path appears directly in the output current.
Thermal Design and the Thermal Pad
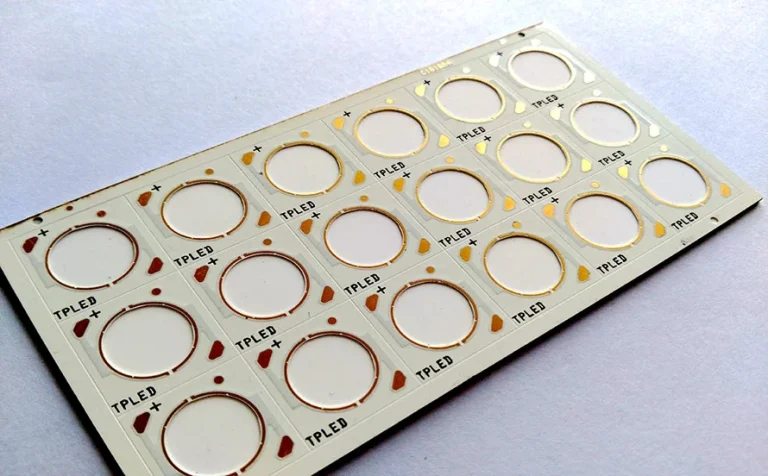
The driver and the LEDs both dissipate power, and both have to be cooled through the board. A boost switch in a small package relies on the thermal pad under its body, and that pad must be connected to a copper area with a grid of vias to the plane beneath. A pad connected with a single via, or left floating because the net was awkward, turns a device rated for a watt into one that runs at its limit.
The LEDs are often more critical than the driver. A string running at 60 milliamperes with a forward voltage of 30 volts dissipates nearly two watts in a small area, and the light output and the lifetime both fall as the junction temperature rises. The board under the LED package should have as much copper as the optical design allows, and the thermal path should be considered at the same time as the mechanical design of the panel.
Temperature also affects the current. If the sense resistors warm up, their resistance rises and the current falls, producing a brightness change as the panel warms. Using low temperature coefficient resistors and placing them away from the LEDs keeps that change small, and the same care applied to current carrying traces keeps the voltage drop from adding to the error.
Layout of the Boost Stage
The switching loop formed by the switch, the diode and the output capacitor carries a pulsing current and must be as small as the board allows. Place the output capacitor directly across the diode and the switch, and route the return to the input capacitor on a wide, short path rather than through the general ground plane. This is the same rule set out in our guide to converter layout and routing, and it matters even more here because the LED current is continuous and any disturbance is directly visible.
Keep the switching node copper small and away from the current sense traces. The node is the noisiest point in the circuit, and capacitive coupling into the sense amplifier appears as a ripple in the LED current, which shows up as flicker at low brightness where the loop gain is highest.
The LED string connections should be routed as a pair with their return, kept short, and sized for the current with margin. Where the strings leave the board for a separate panel, provide a connector with a defined pinout that keeps the return close to the outgoing current, and keep the dimming signal separate from the current carrying conductors in the same cable.
Diagnosis of Flicker and Uneven Brightness
Flicker at low brightness usually comes from the control loop rather than from the LEDs. The sense voltage becomes very small, the loop gain drops, and noise in the sense path modulates the current. Check the sense trace routing, increase the sense voltage if the power budget allows, and confirm that the compensation network suits the lowest current at which the display operates.
Uneven brightness between strings points to the matching problem already discussed. Measure the current in each string rather than the voltage across the LEDs, because the voltage is a poor indicator of current in a string with a steep characteristic. If the currents differ by more than a few percent, the regulators or the sense resistors are the place to look.
Audible noise from the inductor or the panel is a mechanical symptom of an electrical problem. The dimming frequency may be inside the audible band, the converter may be entering a burst mode at low brightness, or the loop may be unstable at a subharmonic frequency. Changing the dimming frequency is usually the quickest way to identify which of the three is responsible, and the suppression techniques used for any switching supply apply here, as described in our article on EMI suppression design.
FAQ
Can I drive an LED backlight directly from the battery? Only if the string voltage is below the minimum battery voltage over its whole discharge range. Otherwise a boost stage is needed, and the driver must handle the case where the battery falls below the minimum operating voltage.
Why do my LEDs dim as they warm up? The forward voltage falls with temperature, so a constant voltage drive produces more current, while a poorly compensated current loop can produce less. Measure the string current at both temperature extremes to identify which effect dominates.
Is a series resistor enough to match two strings? Rarely. A resistor helps at high current where the voltage drop is large, but at low dimming levels the forward voltage difference dominates and the mismatch returns.