




Choosing Pad and Hole Sizes for PCB Prototypes
Hole size looks like a trivial dimension. A lead of a known diameter goes into a hole of a slightly larger diameter, and the pad around it is drawn to suit. In practice the choice is constrained from both sides: the hole must be large enough to assemble reliably and small enough to keep the pad, the annular ring and the drilling process within their limits.
Starting From the Lead
The nominal lead diameter is the starting point, and the hole is specified above it. Too tight and the lead will not enter without stressing the plating. Too loose and the component sits at an unpredictable position, the solder has to bridge a gap it cannot fill reliably, and the joint becomes a source of intermittent faults.
The allowance depends on the component type. A round lead in a hand inserted part needs less clearance than a rectangular lead that must be inserted at an angle, and a connector with many pins needs more allowance than a single lead because the pin positions themselves have tolerance.
The Annular Ring
The annular ring is the copper that surrounds the hole on the pad. It must survive the drilling tolerance, the layer to layer registration and the etching tolerance, each of which eats into the nominal figure.
Minimum annular ring is one of the constraints a fabricator quotes, and it is often the feature that limits how small a hole can be used with a given pad. A design that draws a generous ring but a tight pad leaves nothing for the tolerances, and the result is a broken or thin ring on some fraction of the boards.
Pad Diameter and Solder Joint
The pad must be large enough to form a fillet and to be inspected. A pad that is only slightly wider than the hole produces a joint that is difficult to see and easy to damage, and rework on such a pad is likely to lift it.
For surface mount pads the same principle applies in a different direction. A pad that is too small for the component leaves the joint reliant on the lead itself, while one that is too large allows the component to shift during reflow or to be displaced by the surface tension of the molten alloy.

Aspect Ratio and Drilling Limits
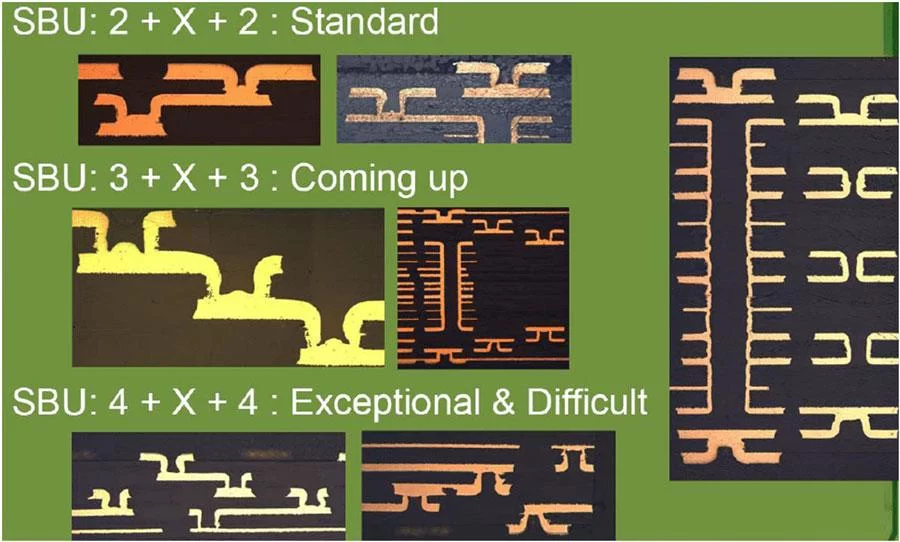
Deep holes are harder to plate evenly. The aspect ratio, the board thickness divided by the hole diameter, describes that difficulty, and above a certain value the plating chemistry cannot reliably coat the centre of the hole.
This is where board thickness and hole size become linked. A thick board forces larger holes to keep the ratio acceptable, which in turn forces larger pads and consumes routing space. Where a design needs small holes in a thick board, the fabricator may need to use a different plating process or to reject the design. The relationship is the same one described in our 32 layer board cost notes.
Drill Tolerance and Finished Size
Drilling does not produce a hole at exactly the nominal diameter. The bit wears, the machine has positional tolerance and the plating adds copper to the wall, so the finished hole is smaller than the drilled one.
Fabricators therefore quote a finished hole size and manage the drill size to achieve it. A designer who specifies the drill size instead of the finished size will receive holes that are too small, and the error is systematic rather than random.
Prototype Considerations
On a prototype the priority is that the board can be assembled and reworked, because it will be modified. Holes at the larger end of the acceptable range make hand assembly easier and make rework less likely to damage the plating.
Once the design is frozen, the dimensions can be tightened for the production build, where assembly is automated and rework is minimised. Specifying the prototype dimensions as if they were production dimensions is a common cause of a first build that cannot be debugged easily. Our PCB prototyping article lists the other checks worth making before an order is released.
Holes for Connectors and Mechanical Parts
Connectors and mounting hardware are dimensioned differently from component leads. A mounting screw needs a clearance hole that matches the screw diameter plus a tolerance, and the pad around it may be omitted entirely if the hole is not electrically connected.
Plated and non plated holes should be distinguished clearly in the drill file. A mounting hole that is accidentally plated can short to an internal plane, and one that is accidentally non plated can leave a connector without its ground connection. Checking this before release is the sort of item that belongs on a design release checklist.
Slots and Non Round Holes
Some parts need a slot rather than a round hole, either because the component has a flat tab or because the mechanical design requires adjustment. Slots are routed rather than drilled, which means they cost more and require a larger keep out than a circular hole of the same width.
The plating inside a slot is less uniform than inside a round hole, because the geometry makes the current distribution less even. Where a slot must be plated, the fabricator’s capability should be confirmed before the design is frozen. The same class of constraint appears in blind and buried via work, where the geometry limits what can be plated reliably.
Checking the Drill File
The drill file should be reviewed as a drawing, not as a data file. Every hole size should be listed with its quantity, and the count should match what the layout intends.
An unexpected hole size in the list is usually a padstack that was edited and never corrected, and it will produce a tool that the fabricator may not stock. Reviewing the list before release takes a few minutes and removes a class of quotation queries. Our PCB design optimisation case notes show how these small errors accumulate.
Prototype Iteration and Hole Sizes
A prototype board is usually modified, and holes are among the features that are hardest to change once the board exists. A hole that is too small can be enlarged with a drill, but the operation removes plating from the barrel and may destroy the connection to the inner layers.
A hole that is too large for the lead it receives cannot be corrected at all. That asymmetry is the argument for choosing the more generous end of the acceptable range on a first build, and tightening the dimension only when the design and the assembly process are both settled.
Standards and Defaults
Most designers work from a padstack library that encodes decisions made once and reused. That is efficient, but the defaults accumulate, and a library that was built for a two layer board may not hold dimensions that suit a high layer count stack.
Reviewing the padstacks against the current fabricator capability is worth doing periodically. A single visit to the library removes the same error from every design that follows, and it costs nothing compared with finding the problem on a released board.
FAQ
How much clearance should a hole have over the lead? Enough for the lead to enter without force, which is typically a few tenths of a millimetre. Rectangular leads and multi-pin connectors need more.
What is the minimum annular ring? It depends on the fabricator capability, and it is normally quoted as a figure that already accounts for registration and drilling tolerance.
Can small holes be used in a thick board? Only up to the aspect ratio the process supports. Beyond that the plating will not be reliable, and the design needs larger holes or a thinner board.


1 Comment
PCB Layer Structure and What Each Layer Does
[…] without a hole or a hole without a pad is a defect that no amount of inspection will correct. Our pad and hole size article describes how those dimensions are […]