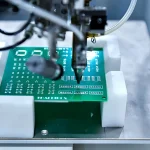
Paste Jetting and Dispensing for Odd-Form Components
A stencil prints a whole panel at once and does it well. It stops being the right tool when the board is not flat, when the paste has to go somewhere a squeegee cannot reach, or when the volume needed at one location is far outside what the rest of the board wants. Paste jetting fills those gaps.
The technique deposits a defined droplet of material without touching the board, which removes the stencil, the squeegee and the board support from the equation. It is slower per deposit than printing, and on the right application it is the difference between an assembly that can be built and one that cannot.
Where Printing Stops Working
Printing requires a flat surface, a stencil that sits on it and a squeegee that can press paste through the apertures. A board with a tall component already fitted, a cavity or a step cannot be printed, and a select solder area on an assembly that is otherwise complete has no stencil to use.
The other limit is volume. Where one location needs several times the paste of its neighbours, a single stencil thickness cannot serve both, and the step stencil that solves it is expensive and slow to make for a small production run.
How Jetting Differs from Printing
A jetting head ejects a small droplet of paste with a piezoelectric or a pneumatic actuator and builds the deposit from a number of droplets. The volume is set by the number of droplets and by their size, both of which are programmable.
Because the head does not touch the board, the deposits can be placed on an uneven surface and the height of the deposit is not limited by a stencil. The trade is speed: each deposit takes a finite time, and a board with thousands of pads is not a candidate for jetting.

Deposit Volume and Its Control
The deposit volume is the product of the droplet volume and the number of droplets, and both have tolerances. The droplet volume depends on the nozzle, the pressure and the properties of the paste, and it drifts as the nozzle wears.
Controlling the volume therefore means controlling all three and verifying the result. A weigh scale measurement of a defined number of deposits is the simplest check, and it should be made at the start of a run and at intervals during it. The tolerance on the deposit is the same one that applies to a printed deposit of the same size.
Nozzle Diameter and Wear
The nozzle diameter sets the droplet size and the smallest aperture that can be served. A nozzle that is too large for the pad produces a deposit that spreads beyond it; one that is too small takes too many droplets to fill the volume and lengthens the cycle.
Wear is the practical limit. An abrasive paste erodes the nozzle over time, which changes the droplet volume without any change in the program. Tracking the volume measurement against the nozzle life gives a replacement interval that is based on evidence, and it prevents a slow drift in the deposit from being attributed to the paste.

Paste Requirements for Jetting
Not every paste can be jetted. The material has to be homogeneous, free of large particles relative to the nozzle and stable enough that it does not separate in the reservoir. A paste that prints well may jet badly, and the formulation is a specific requirement rather than an afterthought.
The working life in the reservoir matters as much as it does on a stencil. Material that is exposed to air thickens, and a thickened paste jets irregularly. Managing the quantity in the reservoir to what will be used within the working life is the same discipline as loading a stencil.
Dispensing of Adhesives and Underfill
The same platform usually dispenses adhesives, underfill and encapsulants as well as paste, and the requirements are different for each. An adhesive has to stay where it is placed without slumping, while an underfill has to flow into a gap by capillary action.
The nozzle, the pressure and the dispense pattern are chosen for the material. A pattern that works for an adhesive will not fill a gap under a package, and the volume has to be matched to the gap height and the perimeter that has to be sealed.
Programming and Vision Alignment
The program carries the position of every deposit and the volume required at each one. Reference points on the board are used to locate the pattern, and a vision system verifies the substrate before the deposits are placed.
Where the board has already been populated, the vision system also serves to avoid the parts that are already there. A dispense path that crosses a component will deposit material where it is not wanted, and the collision avoidance is part of the program rather than an operator responsibility.
Process Control and Inspection
Verification of the deposit uses the same tools as a printed deposit: a paste inspection system where the pattern is regular, a visual check where it is not. The measurement should be made before the assembly is populated, because that is the last point at which the deposit can be corrected.
Recording the volume, the nozzle life and the paste batch makes the process traceable. Where a defect appears later, the record shows whether the deposit or the downstream process is the more likely cause, which is the same approach described for the wider quality control of an assembly.
When Jetting Beats a Stencil
An odd form component that is fitted after the main reflow is the classic case for jetting, because no stencil can reach it; jetting wins where the volume is low, the geometry is awkward or the material is not available as a paste that prints. It also wins where the board carries a step, a cavity or a component that is already fitted, since none of those obstacles exist for a non contact method.
Printing wins on throughput and on cost per deposit for a regular pattern, and for a standard odd form component that shares the stencil with the rest of the board it is usually the cheaper answer, as with any other choice made under pad design rules. Most mixed technology assemblies use both, printing the main pattern and jetting the exceptions, which keeps the cycle time where it belongs while making the difficult deposits possible.
Cost and Throughput Comparison
The comparison against printing is not only the time per deposit. Printing needs a stencil, a printer setup and board support, while jetting needs a program and a nozzle. For a short run or a prototype, the setup cost of the stencil can exceed the total jetting time.
For volume production the balance shifts towards printing, and the jetting head is reserved for the features that the stencil cannot produce. Choosing between them per application rather than per product is the approach that keeps both the cost and the capability where they are needed, and the decision is recorded alongside the other process choices in the manufacturing tolerances.
FAQ
Can jetting replace printing entirely? Only for low volumes or unusual geometries. Its speed per deposit is far lower than a stencil over a whole panel.
Does jetted paste behave the same as printed paste? The reflow behaviour is the same if the volume is the same. The difference is in the shape of the deposit and in the amount of air it contains.
How is nozzle wear detected? By measuring the deposit volume at intervals and comparing it with the value recorded when the nozzle was new.