Via Drilling in Prototype Boards: Through, Blind and Buried
Drilling is one of the largest single cost elements in a prototype order, and the type of hole chosen determines not only the price but the number of lamination cycles the panel has to survive. Understanding the three via types and what each one costs is what allows a design to be built at a sensible price without giving up the density it needs.
Why Drilling Costs So Much
Drilling accounts for a substantial share of the cost of a prototype panel, in the region of thirty to forty percent on a typical multilayer order. The reason is that each hole has to be positioned accurately with respect to every layer, drilled with a tool whose life is measured in hits, and then plated so that the barrel connects the layers it passes through.
Registration is the expensive part. A hole that misses its pad on one layer is a defect, and the tolerances from lamination, drill positioning and imaging all accumulate into that result.
What Vias Do on a Board
A via has two jobs. Most are electrical, connecting traces on different layers. Some are mechanical, providing a locating or mounting feature, and those are usually larger and toleranced differently from the interconnection vias.
Both kinds are drilled in the same operation, which is why the plating of a mechanical hole is sometimes unnecessary and sometimes essential, depending on whether it has to be connected to a net.
Through Holes
A through hole passes through the entire board. It is the simplest type to produce, the cheapest, and the most forgiving of registration error, because it can be drilled after all the layers have been laminated and the panel is dimensionally stable.

Through holes are the default for that reason, and most designs use them exclusively. Their drawback is that they occupy space on every layer they pass through, which limits the density a design can achieve and forces more layers when the routing gets tight.
Blind Vias
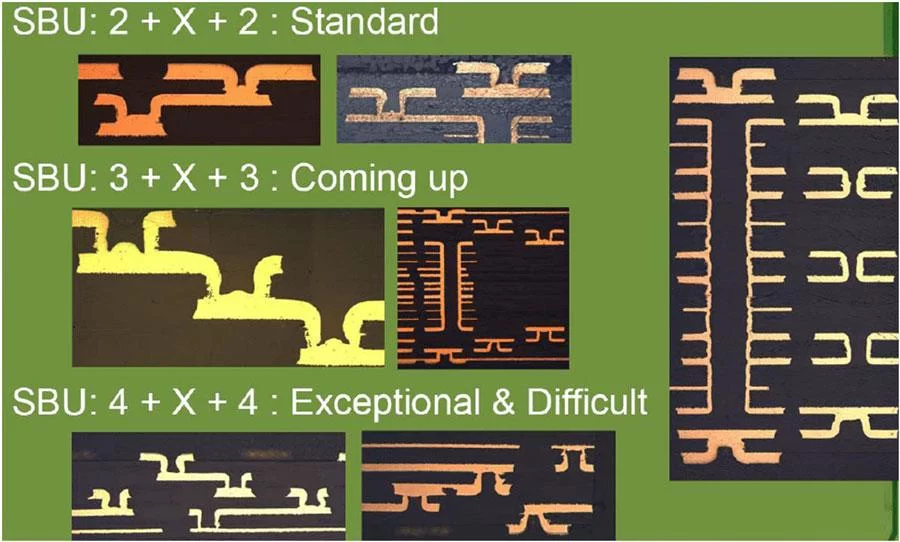
A blind via starts at an outer layer and stops at an inner layer without passing through the board. It connects the surface to an internal layer, which is enough for most escapes from a dense package and saves the space that a through hole would consume on the layers below.
The constraint is that it has to be formed before the outer layers are laminated, which means the panel is built in more than one press cycle. Registration across those cycles is what sets the practical limits on blind via diameter and depth, and the depth is normally expressed as a ratio to the drill diameter.
Buried Vias
A buried via connects two or more inner layers without reaching either surface. It is formed by drilling and plating a subassembly before the remaining layers are pressed around it, which makes it the most expensive of the three types because it requires the most process steps and the tightest control.
Buried vias are used where the density justifies the cost, typically in high-layer-count designs where routing space on the inner layers is the limiting factor. Several inner layers may be overlapped during the formation of the subassembly, which is why the drill programme and the lamination sequence have to be planned together.
What Blind and Buried Vias Buy
Used deliberately, blind and buried vias reduce the board area and the layer count for a given routing density, cut the number of plated through holes that pass through every layer, and improve the electrical behaviour by removing the stubs that a through via leaves behind.
That last point matters at high frequency. A through via on a thick board has a long stub, and the stub resonates within the band of interest on a fast interface. A blind via has no stub by construction, which is one of the reasons HDI designs can carry faster signals than the same net count on a conventional stack. Blind and buried via stack selection covers the stackup decisions that go with them.
Choosing the Right Mix
Most designs should start with through vias and change only where the fanout or the stub length forces it. The first place to look for a problem is the escape from the largest package; if through vias cannot reach the inner layers without consuming too much space, a single blind via layer is usually enough to solve it.
Buried vias are a later resort, and they should be introduced in a way that the fabricator can build in one sequence rather than in several. Via in pad or plated through covers where a via may sit relative to a pad, and Electroplating and via filling in HDI covers the plating that follows the drilling.
Cost and Lead Time
Each additional hole type adds a process step, and each process step adds lead time as well as cost. On a prototype order the effect is larger than on production, because the setup is a fixed cost that a small quantity has to absorb.
This is why a design that uses through vias everywhere and accepts one extra signal layer is often cheaper than one that saves the layer and needs two lamination cycles. The comparison should be made explicitly rather than assumed.
FAQ
Design Rules for Drilled Holes
Every hole needs an annular ring wide enough to survive the accumulated registration tolerance, and the ring has to be larger on the layers where registration is worst. Where a hole passes through a plane, it needs a clearance that keeps it isolated from that plane unless the connection is intended, and the clearance has to allow for the same tolerance.
Aspect ratio is the other constraint. The ratio of the board thickness or stack height to the drill diameter determines how well the plating chemistry can reach the middle of the barrel, and beyond roughly 8 to 1 the deposit becomes thin in the centre unless the process is supported with agitation. Where a design needs a small hole in a thick board, the fabricator should confirm the ratio before the layout is finished. Electroplating and via filling in HDI covers how the plating is adapted for the smallest holes.
Ordering the Holes by Priority
When a design has to mix hole types, it is worth listing them explicitly on the fabrication drawing: which holes are through, which are blind and from which layer, and which are buried between which layers. The drill programme and the lamination sequence are derived from that list, and an implicit assumption in the CAD file is not a substitute for it.
It is also worth checking whether the blind vias can be replaced by through vias with a small change of placement. A hole that is blind because of a single congested area is often avoidable, and avoiding it removes a lamination cycle from every board in the order.
Why are blind and buried vias more expensive? Because the panel has to be built in more than one press cycle and drilled more than once, and each additional cycle adds registration tolerance and handling.
Can bury vias be used on a four-layer board? In principle a buried via needs at least four layers to have two inner layers to connect. It is rarely economic at that layer count, where through vias usually fit.
Do blind vias improve signal quality? They remove the stub that a through via leaves below the layer the signal uses, and at high frequency removing the stub is worth more than the additional process cost.