PCB Inner Layer Process: Seven Steps to a Finished Core
The inner layers of a multilayer board are made first, as separate thin cores, before anything is laminated together. Each core is a copper clad sheet that has been imaged and etched into a circuit pattern, and the quality of that pattern decides the registration, impedance and yield of the finished stack. The process runs through seven steps, and each one leaves a mark that later steps cannot correct.
Why the Inner Layers Come First
A multilayer board is built by pressing imaged cores and prepreg into a single panel. The copper patterns that will become the internal signal and plane layers must already exist before that press, because after lamination they are buried and cannot be imaged again. Everything that happens afterwards, from drilling to plating, references the registration targets created in those cores.
That is why the inner layer process carries a disproportionate share of the overall tolerance budget. A small error in line width or a shift during exposure propagates through the whole build.
Step One: Cutting the Copper Clad Panel
The process starts with copper clad laminate, a glass fabric impregnated with epoxy and covered with copper foil on both faces. Panels arrive in standard sizes, and the first operation is to cut them to the working panel format that the shop uses for its tooling.
Panel size is chosen for utilisation, so that as many circuits as possible fit with a sensible margin for the edge strip and the tooling holes. Copper weight and dielectric thickness are fixed at this stage, and a mistake here means the finished board will not meet the impedance or current requirement no matter how well the rest of the process is run.
<img src="https://www.gopcba.com/wp-content/uploads/2026/08/DCA-119-1536×1024-1.jpg" alt="Inner layer panel with copper traces after etching and inspection” />
Step Two: Dry Film Lamination
A photosensitive dry film resist is laminated onto both copper surfaces with heated rollers. Before lamination the copper is cleaned and slightly roughened, because the film must adhere evenly across the whole panel. Any particle trapped under the film becomes a defect in the pattern.
Temperature, pressure and speed of the laminator all affect how well the film conforms to the copper. Too much heat and the film flows and thins; too little and it lifts at the edges during development. The operation is usually carried out in a clean environment, since dust is the main source of opens and shorts at this stage.
Step Three: Exposure
The laminated panel is exposed to ultraviolet light through artwork or, more commonly now, written directly by a laser imaging unit. Unexposed film remains soluble in the developer, while exposed film cross links and stays on the copper.
Registration is the critical parameter. The artwork or the imaging data must align with the tooling holes so that each layer ends up in the right place relative to the others. Exposure energy also matters: an under-exposed film develops away at the edges and gives a narrower line, while over-exposure widens the line and can close a gap.

Step Four: Developing
Developing dissolves the unexposed film in a mildly alkaline solution and leaves the pattern of hardened resist on the copper. The step is quick, and its outcome is checked by measuring the width of the resist lines against the design.
Two things go wrong here. Incomplete development leaves a scum of resist that blocks the etchant and produces a short between adjacent conductors. Over-development attacks the resist edges and produces lines that are thinner than intended, which shifts the impedance of a controlled net.
Step Five: Etching
The panel passes through an acidic etchant, usually a cupric chloride solution, that removes the copper not protected by the resist. The etchant attacks downwards and sideways at the same time, so the finished conductor has a trapezoidal cross section with a sidewall angle that depends on the chemistry and the copper thickness.
Artwork is compensated for that undercut, which is why the film dimensions on a drawing are not identical to the finished line width. Etch rate uniformity across the panel matters too, because the middle of the panel etches differently from the edges unless the machine is well tuned. Any residue from the developing step shows up now as an unwanted short, and the review of copper plating defects explains how similar issues appear on the plating side of the process.
Step Six: Stripping and Inspection
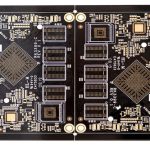
Once etching is complete, the resist is stripped in a stronger alkaline solution, leaving bare copper conductors on the laminate. The panel is then inspected, optically and electrically, and the line widths and spacings are measured against the specification.
Automated optical inspection compares each layer against the CAD data and flags opens, shorts, nicks and residue. Because the layers will be buried, an escape here is unrecoverable: a short between two inner conductors cannot be repaired after lamination, which is why this inspection step is treated as mandatory rather than optional.
Step Seven: Brown Oxide
The final step coats the copper with a controlled oxide layer, ranging from brown to black depending on the chemistry. The oxide is rough at a microscopic scale, and that roughness is what gives the prepreg something to grip during lamination.
Oxide treatment also protects the copper from moisture and handling damage before pressing. The process has to be controlled carefully: too little oxide and the bond is weak, too much and the layer becomes brittle or loses adhesion. Because the chemistry is influenced by the copper surface it is applied to, the condition of the etched copper leaving the previous step directly affects the quality of the result.
Registration, Scaling and Layer Count
Laminate shrinks as it is processed, and the amount of shrink depends on the material and the copper distribution on the panel. Fabricators apply a scaling factor to the artwork so that the finished pattern lands in the correct position after the cores have been pressed.
That is one reason why layer count and stackup should be settled before layout is finished. A stack that places a plane layer directly against a dense signal layer creates unbalanced copper, which changes shrink behaviour and makes registration harder. The way layer arrangement affects routing and manufacturing is discussed in the guidance on multilayer design rules, and the behaviour of the material under heat is covered in the notes on dimensional stability and expansion.
Where the Process Goes Wrong
Most inner layer defects come from three sources: contamination under the dry film, incorrect exposure energy and unstable etch chemistry. All three produce pattern errors that are visible after stripping, and all three are cheaper to correct by process control than by inspection.
Measurement closes the loop. Line width, oxide thickness and registration are recorded per lot, and a trend in any of them is a signal to adjust the process before the yield falls. Treating the inner layer stage as a controlled process rather than a preparation step is what keeps a multilayer build predictable.
FAQ
How many inner layers can be processed at once? Each core is imaged individually, so the number of cores equals the number of inner layers. A twelve layer board has ten inner layers formed on five cores, which are pressed together with the outer foils.
Why is brown oxide needed if the prepreg is sticky? Cured prepreg does not bond reliably to smooth copper. The oxide provides a mechanical key, and without it the layers can separate during drilling or thermal cycling.
Can an inner layer defect be repaired? No. Once the layers are laminated, an open or short on an inner layer is inaccessible. That is why inner layer inspection is performed before pressing, on every panel.